Wednesday, June 13, 2012

Pillow Case Hamper


I found this idea on Pinterest and just had to try it. It's a hamper made from a pillow case and an embroidery hook... and that's it! 


I cut a slit in the pillow case where the fabric is doubled over and put the outside layer of the embroidery hoop through the pillow case. It was a little tricky, but not too bad. 


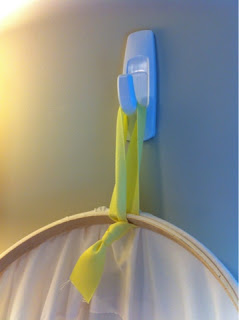
Then I tied a ribbon around the inside layer of the embroidery hoop and put it in the outer layer. And voila! Hamper!


I used a Command hook to hang it. Make sure you read the instructions for those, like waiting an hour before use. And be sure to get one that will hold a significant amount of weight. Mine only holds 5 pounds, which makes me nervous. I guess I'll just be taking my laundry to the laundry room very often

Happy crafting!

Organization

Great organization tip: use over-the-door shoe holders for bathroom storage. I hung on inside the linen closet in my bathroom to hold my hair dryer and straightener, lotions, and everything else that doesn't have it's own place in the closet.


And it all looks so organized! It's super easy to find everything now. There are pockets for lotions, pockets for soaps, pockets for first aid stuff... 


Plus it cleared out a lot of room in the closet. 


Happy organizing!

Tuesday, June 12, 2012

Magical Plastic

I finally found it! I found the magical plastic!


After raiding the recycling bins of many friends (well, really just one friend), I finally found #6 plastic. Using this great tutorial, I made my very own shrinky bracelet.

And it's so easy to make your own!

Well, it's sort of easy. I ended up messing up my first batch because the holes weren't big enough and I took the pieces out of the oven too soon...

Instructions
    1. Find your plastic. Look for the number inside the triangle on plastic containers and make sure it says 6. I found my plastic at Coldstone. Actually I'd been searching high and low for #6 plastic and didn't even notice the cups; a friend pointed it out to me. Keep in mind that plastic containers with flat surfaces will shrink better than round surfaces, so chose a box over a cup.


    2. Cut your beads. They'll shrink to about a third of the size, so plan accordingly.


    3. Color your beads. (Steps 2 and 3 can be switched up. Totally up to you.) Using permanent markers, draw pictures or designs on your plastic. I drew sail boats and anchors and stripes on mine to match my outfit.


    4. Punch holes. Use a standard hole punch to punch holes. You can also round the edges with a nail clipper so they won't be so sharp.

    In my first batch, I used a push pin to poke holes, but the holes were way too small once they shrunk. Use a hole punch! I messed up so you don't have to! 


    5. Bake. Preheat oven to 250 degrees. Place beads on a lined cookie sheet and place in the oven. All of the tutorials I read said the plastic would curl after about 30 seconds, but mine took 45 seconds - 1 minute. Just be patient. Once they start to flatten again, you can pull them out. While they're still hot, you can press them flat. Just be careful, because they're hot!

    My first batch didn't turn out too great. I took them out of the oven too early and didn't flatten them soon enough. 

    So I started again with batch two. (The waves from the cup ended up going away once the plastic shrunk.)

    6. Make your bracelet. I strung my beads together with stretchy cord, but you could also attach them with jump rings or anything else. Just make it your own!


    Hope this is helpful. Remember to check out Rust & Sunshine's tutorial!
    Happy crafting!

    Monday, June 11, 2012

    Striped Nails

    Check out this striped mani!


    I painted my nails with the blue yesterday. {Sidenote: Wet n' Wild nail polish is currently BOGO 50% off at Walgreens, and it's only $1.99 anyways.} Then I taped them and painted with silver today.


    If you're doing the taping manis, make sure you let the polish dry completely before you peel off the tape. Even fast dry polish will peel off if you take off the tape too soon.


    Happy crafting!

    Sunday, June 10, 2012

    The Prettiest Way to Throw Stuff Away


    I found this great idea on Pinterest for a designer car trash bag and just had to give it a shot! 


    I should have taken more pictures of the process so I could give a tutorial, but I forgot... So I'll just give a step-by-step without the pictures. If my process doesn't make any sense, you can also check out this tutorial, which I didn't find until after I made my trash bag. Oh, well.

    Materials:
    • Interfacing - 1 yd made 3 trash bags
    • Scrap fabric - I found some fat quarters and ended up with plenty left over
    • Ribbon 
    Instructions:
    1. Quilt the sides: I quilted the fabric together first. This is totally optional. Mine is quilted, but my friend made one, too, and hers is all the same fabric, so she just cut her fabric to size. 
    2. Make the sides: Next, pin together the outside layer of fabric, the interfacing, and the lining fabric. This will make a sandwich. Then stitch around the edges and (optional) down the middle to hold it all together.** Dimensions for mine were about 14''x10'', but you can make it any size. 
    3. Add a border: After stitching the fabric to the interfacing, attach a ribbon to the top. I did this to make it look more finished. Pin on the ribbon and stitch as close to the edges as possible. 
    4. Make the bottom: Cut out 1 circle of interfacing and 2 circles of fabric (about an 8'' diameter). Make another sandwich and stitch together. This will be the bottom of your bag.
    5. Attach the bottom: Put the circle against the length of the sides with the pretty sides of the fabric touching. Starting about 2 inches in, stitch together. Go very slowly so you can follow the circle. I didn't pin it before I started sewing, but you may want to. 
    6. Finish the sides: Once the circle is attached, sew together the edges of your sides. Then flip your bag right-side-out. Ta-da! 
    7. Embellish: Add a button, a ribbon handle, a flower, or anything else! 
    8. Start using it! Stick a plastic bag in it and start throwing away trash! Mine's been done for all of an hour and I already have trash in it. 
    The bottom was really tricky. Be sure to stitch slowly if you're using a sewing machine. 

    Step 7: Embellish. I added the button because the stitching from the ribbon was really ugly, so I wanted to cover it. (:
    **

    **The blog where I found this project did step 2 a little differently than I did. I'm pretty sure her interfacing and her cover were 2 separate pieces instead of stitched together, so she had the trash bag, the interfacing tube, and a plastic bag. 
    I used a Walmart bag for mine. I had to bend over the handles of the bag so they wouldn't hang out over the sides, but I think it looks fine. 

    Again, just comment with questions and I'll be glad to answer them. 
    Happy crafting!

    Saturday, June 9, 2012

    Let's Get Tan!


    before...


    Ever have those days where you want to lay in the sun, but you don't want to put on a swim suit? Just twist a tank top! (:
    Mid-twist

    after


    All you have to do is take the tank off one shoulder and twist it. There's no sewing, no pinning, and if you hate it, just un-twist it!

    Happy tanning!

    Not There Yet


    I went to see a movie the other day and ended up falling in love with a singer. Just thought I'd share.

    Here's the album but Eric Hutchinson. Some of my favorite tracks are "Not There Yet" and "Talk is Cheap." 

    Happy listening!