Tuesday, July 29, 2014

Beach Vacation Capsule Wardrobe

While packing for my month in Italy, I came across this great post with tips and tricks on how to pack a capsule wardrobe, or a month's worth of outfits in one small suitcase with as few items as possible. After actually living out of a suitcase this month, I decided to post my own checklist for packing for a month at the beach.
The first step to packing this suitcase is to pick out your basics. I brought along my favorite skinny jeans, a few tops that I wear often, and a couple of pairs of shorts I like. As I was getting dressed every morning, though, I realized I needed to actually have a pair of dark shorts and a pair of light shorts - not the denim and blue that I had brought along. A quick trip to H&M solved my problem, however. Just make sure that everything you pack is something you enjoy wearing and feel comfortable in... otherwise you'll realize three days into your vacation that you have nothing to wear!

After you've picked out the basics, you can move on to picking out your interest items. Focus on colors and textures to pair with your basics and make your outfits more interesting. I chose a color scheme to make sure my outfits all sort of tied together. In the picture I used mainly mint and coral, and in my actual suitcase I packed mostly shades of blue.

As for the swim suits, only bring pieces you can mix and match. Chances are you'll get tired of wearing the same two or three suits, but if you can mix different tops with different bottoms, you'll have a new suit every day of the week!

The last step to your capsule wardrobe is accessories. This next part is very important, so pay attention... Bring two purses! Seriously. Trust me. It's awesome to have a huge beach tote to throw all of your stuff in while you soak up the sun, but it is equally as essential to have a smaller purse for just your phone, wallet, and lip gloss when you go out on those warm summer nights at the beach. So just do it. Take two purses.

As for accessories, I recommend taking 2 different pair of earrings and two different necklaces, and then 4 pair of shoes - sneakers, flats, flip flops, and nicer sandals. Also consider taking a belt (only if it works with more than one outfit), some bracelets, or a scarf or two.

Finally, here are some things that capsule wardrobes usually don't include on the list...
If you're anything like me, you'll want to go for a run or work out at least twice during your month long vacation, so you should probably pack for the occasion. I brought running shoes, 2 sports bras, 2 athletic tops, and one pair athletic shorts, and I definitely do not regret the space they take up in my suitcase. Sometimes I just need to go for a run. 

Also think about taking some loungewear, or stuff to just wear around the house. I brought leggings, a nice hoodie, some pajama shorts, and a tank top just to have for lazy days or rainy days. 

If you want to download the packing list for this capsule wardrobe, see all of the outfit options, or just have the print out, you can click here (download the file to see all 6 pages). 

Happy traveling! 
~kat

Wednesday, November 13, 2013

10 Ways Your Apple Devices Can Help You in College

Taking my medicine seems
to not happen in the chaos of,
well, studies and such...
Surely you know by now that smart phones are helpful, and laptops are useful. As college students, though, it's vital that we use those iPhones and MacBooks to their fullest potential. Here are a few ways to use your phone/laptop you may not have considered...

1) Alarms and Reminders
Obvious, sure, but oh-so-helpful! Keep forgetting to take your medicine? Set a daily alarm! Too many errands to remember? Make a to-do list! Can't get out of bed in time for New Testament? (Come on, surely it's not just me...) Set FIVE alarms!

2) iStudiez Pro
This $5 app may be the best five dollars you'll spend in the next four years. (Poor like me? Wait for an iTunes gift card this Christmas!) This app lets you organize your class schedule, professors, assignments, and more! It also has full calendar integration so you can see all of your events for the day in one place.
There's also a version available in the Mac App Store, if you're interested in syncing to multiple devices, which I highly recommend!


Ignore my conversation. I'm just really competitive.
3) Messaging App
This one provides seamless transition in conversation from your iPhone before class to your laptop during that terribly mundane history lecture. Just be sure to turn on read receipts in your settings and you're ready to go! Set up a study date without even leaving class.

4) Soothing Sounds
Whether you're a client of Songza, LastFM, Pandora, or Spotify, you can get the most of your studying experience by breaking with a little jam session every so often, or mellowing your mind with that slow jazz station.
I highly recommend Songza, by the way. The free app/website acts as your own personal Music Concierge. You tell Songza what you're up to, and it recommends a station you may like, including no-lyrics stations for studying!

5) Self Control
Don't have any? That's ok! Tap the Do Not Disturb on your iPhone and download the Self Control app for you Mac and viola! You're all set to cram for that Christian Ministries test tomorrow morning! Self Control blocks the websites you know are distracting for the amount of time you choose. Just be sure you're committed, because once you click that "Start" button, there's no turning back...

6) Quizlet
If you're like me, you never had to study in high school. (If you're not like me, skip to #7.) I've found 2 extremely great ways to study:
#1: grab a study buddy! Talk through your notes together and ask questions about what you don't understand in your extremely jumbled lecture notes from that day you're pretty sure you dozed off.
#2 (here's where the technology comes in): copy your notes from Evernote to Quizlet. Make online flashcards that you and your study buddy can go over, and you can flip through these tomorrow right before your exam. It saves paper, and Quizlet is available on your iPhone and laptop. Plus they just have a really cool story.

7) Evernote
"Copy my notes from Evernote...?" you're thinking. I know, I can hear you. If you don't have Evernote, you need to download it immediately. It lets you take notes in the best way possible. Make to-do lists, collect pictures, quickly save an idea for that 12-page research paper, and clip web articles you need to read before Expos class on Friday. Evernote gives you unlimited storage for all of those articles, notes, and lists, and they're just an all-around cool company.

8) Copy (or other cloud storage client)
If you're like me (nevermind.) You should definitely store your files on the cloud, whether that be Copy (my current favorite), Dropbox, or any other server. This lets you access your files from anywhere as long as you have internet access - including the media center computer that connects to the only printers on campus. This pretty much eliminates the need for a flash drive. Not to mention, Copy gives you 15GB of storage just for signing up!

9) Kindle Textbooks
Consider buying the Kindle format of your textbooks. These are often cheaper, and definitely lighter in your backpack. Plus there is a Kindle app for both your iPhone and MacBook, so really you don't even need to remember to take your Kindle to class. It's super handy to have all of your textbooks in the palm of your hand!
Kindle also offers renting services for certain books, so be sure to look into that.
Bought the wrong textbook? Kindle returns are easy. I realized 2 weeks into the semester that I bought the books for a different section of the course, so I contact customer service and they gave me a refund. Amazon rocks!

10) FaceTime
Need to ask your mom a very important question face to face? Need to ask for your little sister's opinion on your outfit for that bonfire this weekend? Just set up a quick FaceTime call! From either your phone or your laptop you can be in contact with pretty much anyone in the world who has another Apple device. Just be sure those pesky relatives aren't calling you during that history lecture!

Hopefully these help! College is rough, as I'm learning, so it's always nice to have some help along the way, either from study buddies, long-distance family members, or even your technology!

P.S. Don't have an Apple device? I hear there's a new iPhone out...

Happy studying!
~ Kat

Oh, also, I wrote this blog post while studying... The epitome of self control.

Oh, and also! My relatives aren't pesky. I love them all very much. (:

Friday, July 12, 2013

The Litter Box Summer School

This summer I've been working with two of my favorite boys to keep them thinking over the summer. We've been doing music lessons, math, reading, and Spanish, but the longer I've been teaching, the harder it's been to come up with lesson plans, especially since Big and Little are starting 1st grade and preschool, so they are learning different things.

I did some research and found some teaching materials that I really liked, so I started pinning them, when I finally decided just to go ahead and plan out the rest of our summer. And then I decided to share the plans!

Tuesday, July 2, 2013

Let's Upcycle!


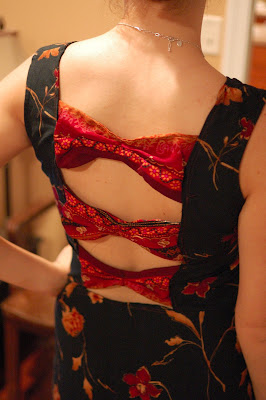
I finally did it. I finally joined the upcycle bandwagon.


I bought this (hideous) dress at Goodwill for $4 last week. It was part of our girls' night. We went to Goodwill and found ungly dresses with upcycling potential.


I really liked the pattern at the bottom, so I wanted to incorporate it a lot in the new design.
follow @oliviaeggroll on instagram

I also wanted to do an open-backed dress, inspired by this instagram post by @oliviaeggroll.

Plus I love bows. I mean, really, they're just adorable. Anyways, here is the finished product! I'm pretty proud of it, considering this is my first ever upcycle.


Hopefully there will be more to come! I did, after all, buy four dresses at Goodwill...


Read more about this project here!

Happy upcycling!
~ kat

Thursday, June 13, 2013

The Green Smoothie Experience

Brace yourself, because this may shock you...

I've been working out every day.

I know. It's crazy. Unbelievable. But true! Granted, it's only been a week, but I'm still proud! I guess since it's summer I've just had more flexibility with my schedule. I'm making time to go to the gym!

Anyways, when I get home from the gym, I'm hungry! But I never really feel like eating, ya know? Like, why would I go to the gym and work out, then come home and eat a full meal? It just doesn't seem right. So instead, I make a smoothie!


It's amazing how much fun a blender can be. This green concoction is made up of, well, whatever I could find in the fridge. I started with a handful of spinach, cause I've heard that goes well in smoothies. There were some strawberries, a few pieces of pineapple, a few grape tomatoes (like I said, whatever I could find in the fridge...), a scoop of vanilla greek yogurt (that was all that was left), some regular vanilla yogurt, and almond milk to fill the blender to 3 cups. That made two pretty delicious servings of what I will now call... The Leafy Love Smoothie.

I made that up just now, so the name's not set in stone...

So there's my creation for the day. And man, was it good after a long hard workout. FatGirl kicked my butt with her squat routine...

Happy crafting!

Wednesday, June 13, 2012

Pillow Case Hamper


I found this idea on Pinterest and just had to try it. It's a hamper made from a pillow case and an embroidery hook... and that's it! 


I cut a slit in the pillow case where the fabric is doubled over and put the outside layer of the embroidery hoop through the pillow case. It was a little tricky, but not too bad. 


Then I tied a ribbon around the inside layer of the embroidery hoop and put it in the outer layer. And voila! Hamper!


I used a Command hook to hang it. Make sure you read the instructions for those, like waiting an hour before use. And be sure to get one that will hold a significant amount of weight. Mine only holds 5 pounds, which makes me nervous. I guess I'll just be taking my laundry to the laundry room very often

Happy crafting!

Organization

Great organization tip: use over-the-door shoe holders for bathroom storage. I hung on inside the linen closet in my bathroom to hold my hair dryer and straightener, lotions, and everything else that doesn't have it's own place in the closet.


And it all looks so organized! It's super easy to find everything now. There are pockets for lotions, pockets for soaps, pockets for first aid stuff... 


Plus it cleared out a lot of room in the closet. 


Happy organizing!

Tuesday, June 12, 2012

Magical Plastic

I finally found it! I found the magical plastic!


After raiding the recycling bins of many friends (well, really just one friend), I finally found #6 plastic. Using this great tutorial, I made my very own shrinky bracelet.

And it's so easy to make your own!

Well, it's sort of easy. I ended up messing up my first batch because the holes weren't big enough and I took the pieces out of the oven too soon...

Instructions
    1. Find your plastic. Look for the number inside the triangle on plastic containers and make sure it says 6. I found my plastic at Coldstone. Actually I'd been searching high and low for #6 plastic and didn't even notice the cups; a friend pointed it out to me. Keep in mind that plastic containers with flat surfaces will shrink better than round surfaces, so chose a box over a cup.


    2. Cut your beads. They'll shrink to about a third of the size, so plan accordingly.


    3. Color your beads. (Steps 2 and 3 can be switched up. Totally up to you.) Using permanent markers, draw pictures or designs on your plastic. I drew sail boats and anchors and stripes on mine to match my outfit.


    4. Punch holes. Use a standard hole punch to punch holes. You can also round the edges with a nail clipper so they won't be so sharp.

    In my first batch, I used a push pin to poke holes, but the holes were way too small once they shrunk. Use a hole punch! I messed up so you don't have to! 


    5. Bake. Preheat oven to 250 degrees. Place beads on a lined cookie sheet and place in the oven. All of the tutorials I read said the plastic would curl after about 30 seconds, but mine took 45 seconds - 1 minute. Just be patient. Once they start to flatten again, you can pull them out. While they're still hot, you can press them flat. Just be careful, because they're hot!

    My first batch didn't turn out too great. I took them out of the oven too early and didn't flatten them soon enough. 

    So I started again with batch two. (The waves from the cup ended up going away once the plastic shrunk.)

    6. Make your bracelet. I strung my beads together with stretchy cord, but you could also attach them with jump rings or anything else. Just make it your own!


    Hope this is helpful. Remember to check out Rust & Sunshine's tutorial!
    Happy crafting!

    Monday, June 11, 2012

    Striped Nails

    Check out this striped mani!


    I painted my nails with the blue yesterday. {Sidenote: Wet n' Wild nail polish is currently BOGO 50% off at Walgreens, and it's only $1.99 anyways.} Then I taped them and painted with silver today.


    If you're doing the taping manis, make sure you let the polish dry completely before you peel off the tape. Even fast dry polish will peel off if you take off the tape too soon.


    Happy crafting!

    Sunday, June 10, 2012

    The Prettiest Way to Throw Stuff Away


    I found this great idea on Pinterest for a designer car trash bag and just had to give it a shot! 


    I should have taken more pictures of the process so I could give a tutorial, but I forgot... So I'll just give a step-by-step without the pictures. If my process doesn't make any sense, you can also check out this tutorial, which I didn't find until after I made my trash bag. Oh, well.

    Materials:
    • Interfacing - 1 yd made 3 trash bags
    • Scrap fabric - I found some fat quarters and ended up with plenty left over
    • Ribbon 
    Instructions:
    1. Quilt the sides: I quilted the fabric together first. This is totally optional. Mine is quilted, but my friend made one, too, and hers is all the same fabric, so she just cut her fabric to size. 
    2. Make the sides: Next, pin together the outside layer of fabric, the interfacing, and the lining fabric. This will make a sandwich. Then stitch around the edges and (optional) down the middle to hold it all together.** Dimensions for mine were about 14''x10'', but you can make it any size. 
    3. Add a border: After stitching the fabric to the interfacing, attach a ribbon to the top. I did this to make it look more finished. Pin on the ribbon and stitch as close to the edges as possible. 
    4. Make the bottom: Cut out 1 circle of interfacing and 2 circles of fabric (about an 8'' diameter). Make another sandwich and stitch together. This will be the bottom of your bag.
    5. Attach the bottom: Put the circle against the length of the sides with the pretty sides of the fabric touching. Starting about 2 inches in, stitch together. Go very slowly so you can follow the circle. I didn't pin it before I started sewing, but you may want to. 
    6. Finish the sides: Once the circle is attached, sew together the edges of your sides. Then flip your bag right-side-out. Ta-da! 
    7. Embellish: Add a button, a ribbon handle, a flower, or anything else! 
    8. Start using it! Stick a plastic bag in it and start throwing away trash! Mine's been done for all of an hour and I already have trash in it. 
    The bottom was really tricky. Be sure to stitch slowly if you're using a sewing machine. 

    Step 7: Embellish. I added the button because the stitching from the ribbon was really ugly, so I wanted to cover it. (:
    **

    **The blog where I found this project did step 2 a little differently than I did. I'm pretty sure her interfacing and her cover were 2 separate pieces instead of stitched together, so she had the trash bag, the interfacing tube, and a plastic bag. 
    I used a Walmart bag for mine. I had to bend over the handles of the bag so they wouldn't hang out over the sides, but I think it looks fine. 

    Again, just comment with questions and I'll be glad to answer them. 
    Happy crafting!